從蝦皮買了這個: 納智捷360四路行車記錄器
自己DIY裝在駕駛座下方,把原本連接eagle view主機的接頭拆下,接到Y cable,然後Y Cable的另一邊接原本的eable view主機, 一邊接到360行車紀錄器上,要拆幾個螺絲,不是很難,可以自己DIY省工錢
安裝好我的汽車上螢幕可以顯示如下:
上螢幕 四公格分別是
左後 右後
前 後
下螢幕是原廠買的行車紀錄器畫面(從AV IN進去),照前方


 | |||
| ST8761 淋浴柱 |
 |
| 切換軸心總成(旁邊綠色裝在塑膠袋裡的是我從裡面拆出來的陶瓷芯閥,這就是罪魁禍首) |
 | |
| 陶瓷芯閥,就是這個東西裡面壞了 |
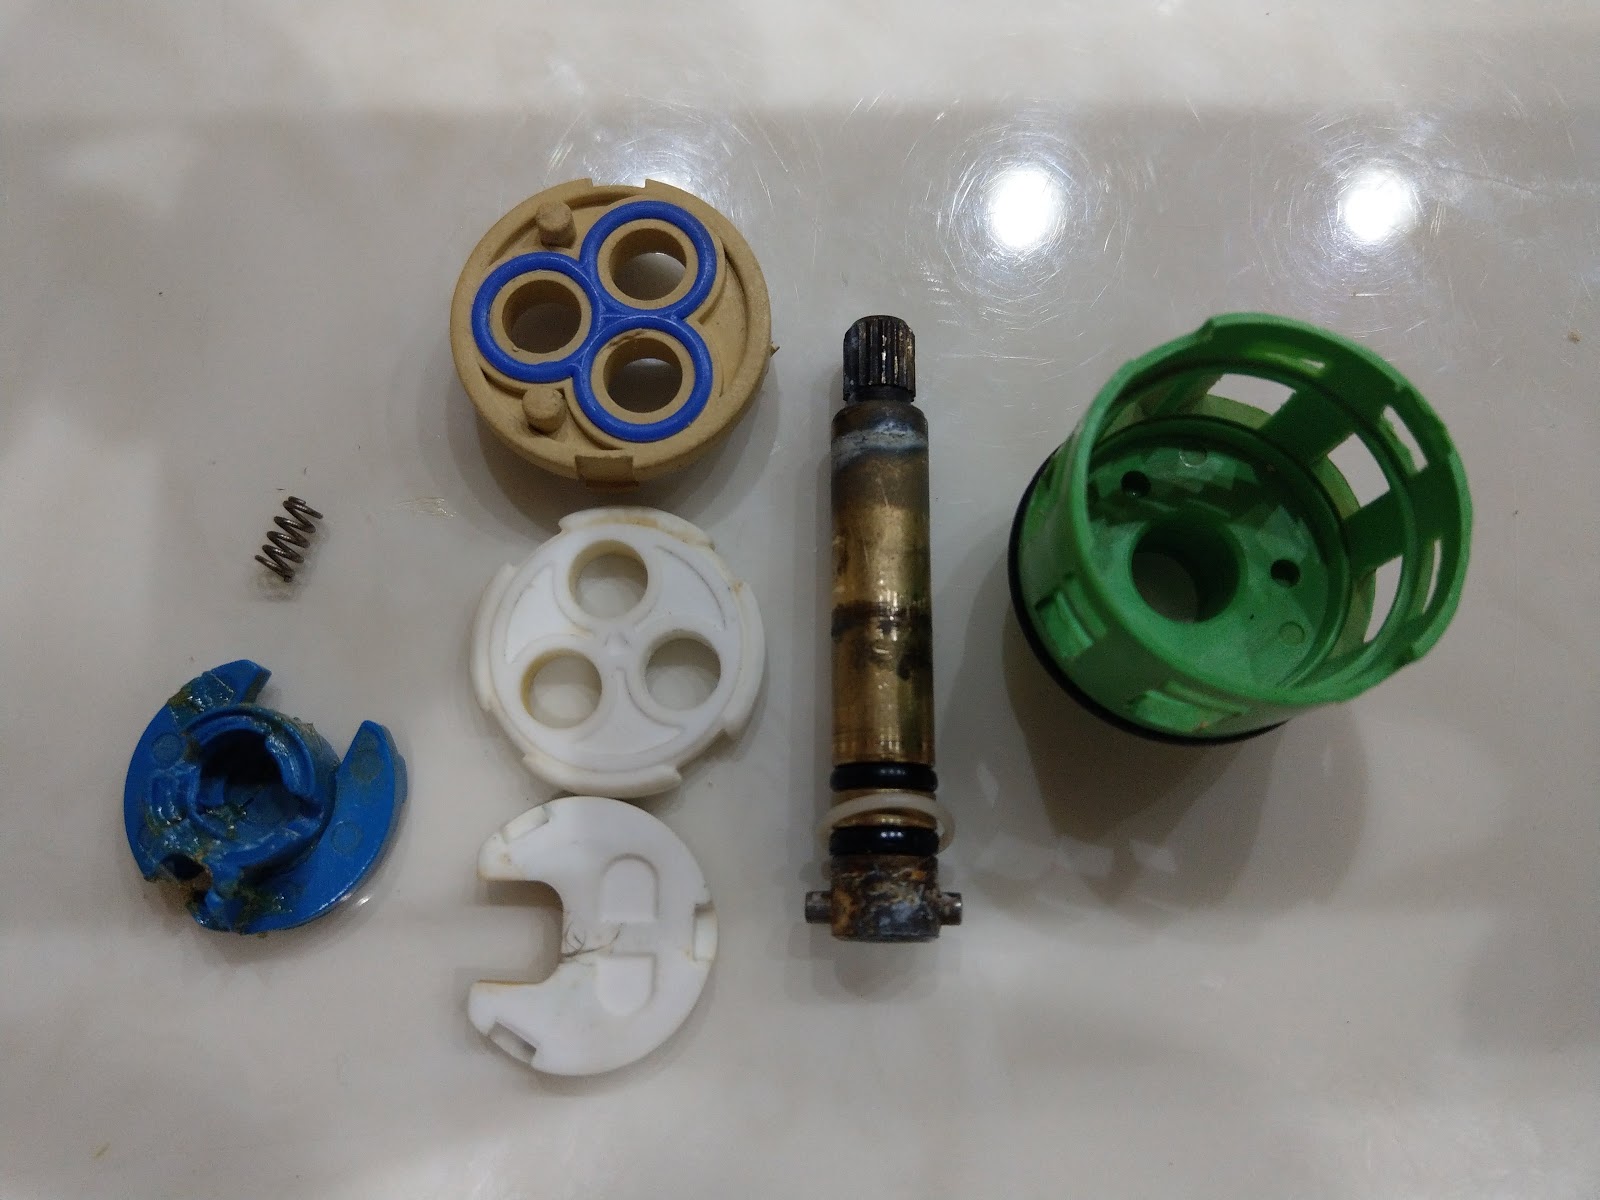 |
| 陶瓷芯閥拆解,左邊藍色的那個塑膠片四分五裂,我稍微用強力膠黏了回去,只是想知道原本長什麼樣子 |
 |
| 重新組裝圖1 |
 |
| 重新組裝圖2 |
 |
| 重新組裝圖3 |
 |
| 重新組裝圖4 |
 |
| 重新組裝圖5 |
 |
| 重新組裝圖6 |
 |
| 組裝完成(可以看到陶瓷芯閥有三個出水孔,這個設計就是利用裡面的陶瓷片搭配彈簧跟塑膠片,牢牢把出水孔頂住,然後藉由旋轉只讓一個出水孔出水,來達成切換) |
 | |
| 切換軸轉開,裡面有三個洞,分別是對應到蓮蓬頭、淋浴頭、六噴嘴頭(幾乎不會使用的無用設計XD) |
HP-UX HDD Backup SOP
2013/2/8 更新 by Henry
2013/2/21 更新,加入4.1, 4.2
1. Shutdown
2. 拔出一顆硬碟,作為備份硬碟, 代號HDD0。
3. 開機,確保還在主機上的硬碟可正確開機,代號HDD1。
PS.若要確保備份硬碟代號HDD0也可以正常開機運作,待HDD1開機確認後,關機,拔出HDD1,插入HDD0,開機確認系統可正常運作。
4. 執行
#vgexport /dev/vg00
讓lvm重新搜尋現有的PV與更新/etc/lvmtab 設定。
否則無法成功執行下面指令(lvreduce or vgreduce...)
確認vgexport 成功。
If that fails then you should do a vgscan.
1) mv /etc/lvmtab /etc/lvmtab.sav
2) vgscan -a
4.1 Reducing mirror from root vg -- vg00
for i in 1 2 3 4 5 6 7 8 9 10;do lvreduce -m 0 /dev/vg00/lvol$i;done
vgreduce -f vg00
or
vgreduce /dev/vg00 /dev/dsk/c2t1d0
還未插入新硬碟(代號HDD2)時,只抓到一顆硬碟(HDD0)。
server # ioscan -fnC disk
Class I H/W Path Driver S/W State H/W Type Description
=========================================================================
disk 0 0/0/2/0.0.0.0 sdisk CLAIMED DEVICE TEAC DV-28E-N
/dev/dsk/c0t0d0 /dev/rdsk/c0t0d0
disk 1 0/1/1/0.0.0 sdisk CLAIMED DEVICE HP 146 GST3146855LC
/dev/dsk/c2t0d0 /dev/rdsk/c2t0d0
^^^^^^^^^^^
代號HDD0
5. online插入新硬碟(HDD2)。
6. 執行#ioscan -fnC disk 確認新硬碟(HDD2)有被抓到。
EXAMPLE:
插入新硬碟後,會抓到第二顆HDD (HDD2)。
server # ioscan -fnC disk
Class I H/W Path Driver S/W State H/W Type Description
=========================================================================
disk 0 0/0/2/0.0.0.0 sdisk CLAIMED DEVICE TEAC DV-28E-N
/dev/dsk/c0t0d0 /dev/rdsk/c0t0d0
disk 1 0/1/1/0.0.0 sdisk CLAIMED DEVICE HP 146 GST3146855LC
/dev/dsk/c2t0d0 /dev/rdsk/c2t0d0
disk 2 0/1/1/0.1.0 sdisk CLAIMED DEVICE COMPAQ BF14688577
/dev/dsk/c2t2d0 /dev/rdsk/c2t2d0
^^^^^^^^^^^
HDD2
7. Adding mirroring to the root vg - vg00
7.1. pvcreate -B /dev/rdisk/c2t2d0
* Create the PV on the second disk so that LVM can manage it
* -B makes it a bootable volume
7.2. mkboot /dev/rdsk/c2t2d0
* Installs the boot files on the second disk
7.3. mkboot -a "hpux -lq (;0)/stand/vmunix" /dev/rdsk/c2t2d0
* Creates an autoboot file on the disk, with information on how to boot
7.4. vgextend /dev/vg00 /dev/dsk/c2t2d0
* extends the volume group to include this second disk.
7.5. vgdisplay -v vg00
* To verify that the second disk is now part of the volume group
7.6. lvlnboot -v
* To verify that the system thinks this disk can boot
7.7. lvextend -m 1 /dev/vg00/lvol1 /dev/dsk/c2t2d0
* This extends the logical volume to the mirrored disk, effectively creating the mirrored copy.
* This command needs to be run for each logical volume in the volume group
注意:每一個lvol*都要做。
EXAMPLE:
server # lvextend -m 1 /dev/vg00/lvol$i /dev/dsk/c2t1d0;done
The newly allocated mirrors are now being synchronized. This operation will
take some time. Please wait ....
Logical volume "/dev/vg00/lvol1" has been successfully extended.
Volume Group configuration for /dev/vg00 has been saved in /etc/lvmconf/vg00.conf
The newly allocated mirrors are now being synchronized. This operation will
take some time. Please wait ....
Logical volume "/dev/vg00/lvol2" has been successfully extended.
Volume Group configuration for /dev/vg00 has been saved in /etc/lvmconf/vg00.conf
7.8 偷懶方式如下:跑回圈一次lvextend全部
for i in 1 2 3 4 5 6 7 8 9 10;do lvextend -m 1 /dev/vg00/lvol$i /dev/dsk/c2t1d0;done
8. done~~

